Most people download a finance app, open it once, and never come back. The setup feels overwhelming, the interface is confusing, and the whole thing ends up buried on page four of their phone. Hunter Vault was built to break that cycle — but only if you start it right.
This guide gives you a concrete action for each of your first seven days. Follow it and by Day 7 you’ll have a working budget, an active Quest Log, and a Hunter Power score that actually means something.
You don’t need to connect a bank account. Hunter Vault works entirely offline — you log expenses manually, which keeps your data 100% on your device. The routine you build here is the heart of Hunter Vault’s money habits system.
What You’ll Need
The setup is minimal. Before Day 1, make sure you have:
- Hunter Vault installed from the App Store or Google Play
- A rough idea of your monthly income (doesn’t need to be exact)
- 15 minutes of uninterrupted time for the initial configuration
- Your last month’s bank statements — optional but helpful for setting realistic budgets
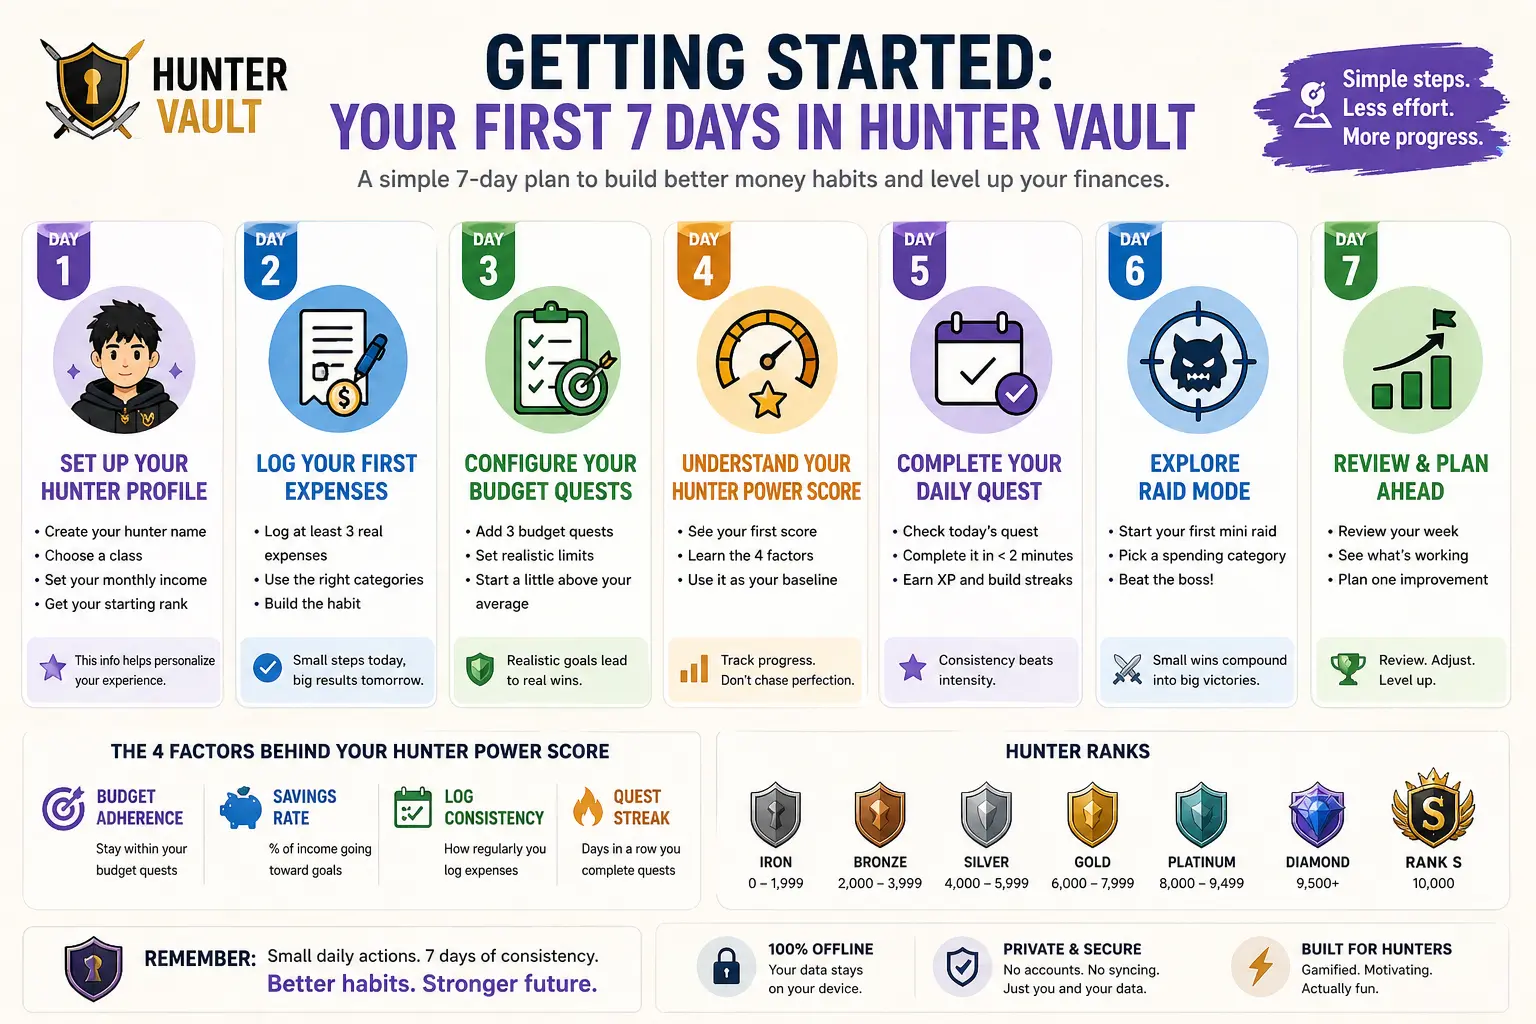
Day 1: Set Up Your Hunter Profile
Your first session is about identity. Hunter Vault uses your profile to calibrate your starting Hunter Power score and assign your initial rank. Spend a few minutes here — the data you enter shapes every recommendation you’ll get going forward.
Open the app → tap Begin Your Journey → enter your hunter name and select a class (each class has different default quest templates — Saver, Debt Slayer, or Wealth Builder). Then set your monthly income. The app uses this as your “base HP” for budget calculations.
Don’t stress about picking the perfect class — you can change it later in Settings. Most new users find Debt Slayer most motivating if they have any outstanding loans or credit cards, and Saver if they’re starting from scratch.
Day 2: Log Your First Expenses
Day 2 is about building the habit of logging. The goal isn’t accuracy — it’s repetition. You want your brain to associate “I spent money” with “I open the app.”
Think back to yesterday. Log at least 3 expenses — coffee, transport, lunch, whatever. Tap the + button, enter the amount, pick a category, done. Each entry takes under 10 seconds once you know the flow.
- Use Needs for rent, transport, groceries
- Use Wants for dining out, entertainment, shopping
- Use Goals for savings transfers, debt payments
“The first three entries are the hardest. After that your brain figures out it’s fast and stops resisting.” — Marcus T., Gold-rank hunter
Day 3: Configure Your Budget Quests
Budget Quests are Hunter Vault’s version of spending limits. Instead of a boring “you spent too much” warning, you get a quest that you either complete or fail — and both outcomes give you useful data.
Go to Quest Log → Budget Quests → Add Quest. Start with the three categories you spend the most on. Set a realistic limit based on last month’s actual spending — not what you wish you spent. You can tighten these later once you’ve proven to yourself you can hit them.
Setting budgets too aggressively on Day 3 almost always leads to failure and abandoning the app by Day 10. Start 10–15% above your actual average, nail it, then reduce.
Day 4: Understand Your Hunter Power Score
By Day 4 you’ll have your first Hunter Power reading. It’s a composite score that looks at four dimensions:
- Budget Adherence — how well you’re staying within your quest limits
- Savings Rate — the percentage of income going to goals
- Log Consistency — how regularly you’re entering expenses
- Quest Streak — how many days in a row you’ve completed your Daily Quest
Your score will be low on Day 4. That’s normal and expected. The Iron rank range (0–1,999) is where every hunter starts. The number’s job right now is to give you a baseline, not to judge you.
Iron 0–1,999 · Bronze 2,000–3,999 · Silver 4,000–5,999 · Gold 6,000–7,999 · Platinum 8,000+ · Diamond 9,500+ · Rank S 10,000
Day 5: Complete Your First Daily Quest
Daily Quests are short, habit-forming tasks assigned every morning. They’re designed to take under two minutes and reward you with XP regardless of whether your budget is on track.
Open the app first thing in the morning → tap Today’s Quest on the dashboard. Common Day 5 quests include: “Log all expenses before 9 PM”, “Check your Needs vs. Wants ratio”, or “Transfer ₱50 to your Savings Goal.” Complete it and collect your XP.
The XP amount feels small at first — that’s intentional. Hunter Vault is built on the compound interest principle: small consistent actions beat occasional large ones. A 5-day streak is worth more total XP than one massive log session.
Day 6: Explore Raid Mode
Raid Mode is optional on Day 6, but worth understanding early. It lets you declare a “boss” — a specific spending category you want to reduce — and track your progress against it over a set period.
Go to Raids → New Raid. Pick a category (Food & Dining is popular for first raids), set a 7-day window, and set a target 20% below your current average. Every time you spend less than budgeted in that category for a day, you deal damage to the boss. Zero spending days are critical hits.
Day 7: Review & Plan Your First Month
Day 7 is your first weekly review. This is the most underused feature in Hunter Vault, and also the one that separates hunters who rank up from hunters who stall.
Go to Reports → Weekly Summary. You’ll see your total spend by category, your XP earned, your Hunter Power change, and which quests you completed vs. failed. Use this data to adjust one budget quest — either tighten a category you beat easily, or loosen one you failed every day.
The weekly review is where most financial growth actually happens. Logging expenses is just data collection — the review is where you turn data into decisions.
Final Tips for Week 2 and Beyond
You’ve done the hard part. Here’s what to focus on after Day 7:
- Log expenses within 4 hours of spending — memory fades fast and estimates reduce accuracy
- Do your Daily Quest at the same time every day to build a trigger habit
- Don’t skip a Weekly Review, even if the numbers look bad — especially if they look bad
- Rank progression is measured in months, not days. Iron → Bronze typically takes 4–6 weeks of consistent use
- Use the Notes field on expensive entries to record your intent — this helps during weekly reviews
The single highest-leverage action in your first 30 days is maintaining your Daily Quest streak. Even if your budget is a mess, a 30-day streak alone will push most hunters from Iron to mid-Bronze.
That’s it. Seven days, seven actions, one functional budget and a Hunter Power score you can actually track over time. The rest is just consistency.
Download Hunter Vault if you haven’t already, and see you on the leaderboard.